Monday, May 7, 2012

Dallas Open Day (part 1) - the Merritt/Kleinman garden

I went to the Garden Conservancy's Open Day in Dallas this past weekend, and I saw five great gardens that I thought I'd share with you.

Since I took a lot of pictures, I'm going to present one garden a day this week.

The first garden I went to was the Merritt/Kleinman garden. This is Texas architect O'Neil Ford's 1958 house with landscaping done by Dallas landscape architects Arthur and Marie Berger.


I got there early, so I had my own personal tour of this house with Dianne Del Cid of Passionscapes.com. She did her Master's thesis on the collaboration of O'Neil Ford and the Bergers, which you can read at the University of Texas Arlington website (scroll down a bit for the link to the PDF).


These are maple trees, with bamboo used as a groundcover. I'm not sure what the border plants are but you could easily get this effect using miniature daylilies.


Here, the Bergers used "trees in threes" (as Dianne put it), mixing oaks for a high canopy, smaller trees and tall bushes for a second story, then a variety of ground covers, forming a deliberate dappled shade garden which was very restful without being overly dark.


Here's the front yard ... I'm not a huge fan of this (it seemed more blandly decorative than useful) but I took a photo to show the way they used the star jasmine and bamboo to make a nice screen for the walkway, which otherwise would be too hot with all the stone and brick there.

So even though they weren't intending for this to be an edible landscape, there's certainly a lot of "stealth" edibles there, as well as some interesting design ideas.


Link to part 2

Link to part 3 

Link to part 4 

Link to part 5 (my favorite)

Friday, May 4, 2012

You Can Grow That! - Roses

Did you know that the rose was named 2012 International Herb of the Year?

Yippee! Roses are wonderful in just about every way.

 I have had very good experiences with growing roses, so it puzzles me when people say that they're difficult to grow. Of course, if you want something that you just stick in the ground and never have to bother with then your choices are more limited.

I like to think of taking care of roses sort of like taking care of yourself -- baggy sweats and dirty T-shirt vs manicured and nicely dressed. You don't get the latter without a bit of care, and that's how roses are.

The key to keeping your roses blooming all season is deadheading.

If you're not familiar with the term, it means taking off the old beat-up roses and any that have lost their petals. I go out in the yard in the mornings and do this, but you can do it any time.

If the plant has too many rose hips on it (what they call the fat part under the flower after the petals fall off) then it will stop blooming. Also, take off any leaves with spots on them, or any that turn brown.

Now this is the important part: do not leave these old nasty leaves on the ground, especially if they have spots on them, look powdery, or show any signs of plant illness. Get rid of them.

If you keep your roses cared for, they will reward you with amazing flowers.

One of the first things I planted when we moved here was this beauty:


This gives me the most amazing, fragrant roses! One of these days I'm going to make some rose jelly with the petals -- it smells that good.

I bought this at Wal-Mart of all places, and it does get a few spotted and browning leaves on it, especially during our hot, humid summers. But over time, it has gotten stronger and the problem has improved considerably. And I have never sprayed or applied any sort of poison, so I can make whatever I like with these flowers and not worry at all about it.

--

You Can Grow That! is a campaign created by garden writer and master gardener C. L. Fornari. On the fourth of each month participating garden bloggers will write about something you can grow. Stop by the You Can Grow That! Facebook page to read all of the posts.

Tuesday, April 17, 2012

We have a winner!

"Quozzle" was the one who guessed how I edged my yard without using power tools:

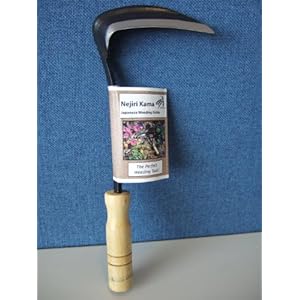
I used this sickle weeder:


I looked at this a long time before I got it. It looks kind of scary but it really isn't. If you have the sense to use a kitchen knife without opening an artery you can use this -- just keep your fingers out of the way!

And it's fast, too -- by the time you persuade someone to do the edging, they get gas for the weed trimmer, they get back, do the edging and put the trimmer away, you can be done with it. And it doesn't use up any power.

It's not only great for edging, it's useful for cutting high grass, stands up fine to working around concrete (although that does dull the edge after a while but that's what sharpening files are for) and can cut pencil-sized saplings that try to take over (somewhere around here we have an elm tree that is doing just that). Just hold on to the top and whack them at the base.

Someone left a review there at Amazon that it seemed small for him. I have a large hand for a woman (medical people, I wear a 7 1/2 glove) and it seemed just fine for me. So unless you have a really huge paw you shouldn't have too much trouble with it. But it is NOT for lefties -- there's no way to reverse the blade that I can see.

So there you go! I love it, and use it all the time.

Tuesday, April 10, 2012

Do you see what I did there?

Tell me: how did I do this?


The first one to tell me what tool I used to edge my lawn here will get one!

(hint #1: it was not a powered weed trimmer)

(hint #2: I have mentioned this particular tool in a prior post)

Wednesday, April 4, 2012

You Can Grow That! -- Cherry tree

Remember my Food4Wealth experiment? Well, here's the center of my potager:


And in the middle is a sweet cherry tree!

(To be more precise, it's a Starkrimson Sweet Cherry from Stark Bros, which is in Missouri. I ordered the "dwarf supreme".)

This was ridiculously easy to plant. The hardest part was digging the hole, which the directions said to dig 2x2x2 feet. So my husband and I got out there a few days after a rain and started digging ... and it really didn't take that long.

I was so excited to see it putting out leaves that I ran back inside for the camera and took this photo for you. I imagine it will make flowers and fruit in a year or two, once it gets big enough.

--

You Can Grow That! is a campaign created by garden writer and master gardener C. L. Fornari. On the fourth of each month participating garden bloggers will write about something you can grow. Stop by the You Can Grow That! Facebook page to read all of the posts.

Tuesday, April 3, 2012

Get great-looking edging fast

I went outside this past weekend, and there was a lot to be done.

It's finally nice out. You go outside to tidy up after a few weeks of bad weather and then you find something like this:


You know a border is in there somewhere ... but where?


Aha! There it is! But look at all the weeds on the side next to the walkway ... the thought of pulling out each bit of bermuda grass next to the concrete was daunting.

I was looking at this and thinking, "there's got to be a better way" ... and I was right!

First, you have to have the right kind of edging, and it so happened that I did:


This edging is modular -- each piece slides into the other. You notice that one end is thinner than the other? The thicker end has a hole running along its length; the thinner one doesn't. I'll show you how this works in a bit.

This particular edging I got from Gardener's Supply, but if you search on Amazon.com for "pound in edging"you get a whole variety of shapes and sizes.

The first thing you do is to push back whatever you don't want next to the walkway.


You see where the white arrow is pointing? There is a hole in the top of the edging piece there. The black arrow points to the end of the other piece, where the edging is narrow. The narrow side slides into the hole in the wider side. I didn't get a picture of the process, but here's what it looks like after you push the piece in:


Then you just keep going along the row until they're all done, cut back the worst of the weeds, sweep up a bit, and there you go!


Not perfect, but much better than it was!